
U2.5 實作:從 reference path 到 Flow ODE
設定:先固定其餘條件
沿用 U1.5 的 two-moons toy、MLP 與 random seed,只改 reference path、training target 與 sampler。這樣最後看到的差異才不會混入網路大小或資料不同。
本單元的符號是:
它和 U1 的 diffusion 時間方向相反,寫程式前先把兩端對一次。
下載 Week 4:Flow Matching 與 ODE 取樣 notebook(.ipynb)
步驟一:製造 reference path
使用 Lipman 等人的 linear Conditional Flow Matching [1],也就是 U2.1 的直線:
從端點製造 model input 與 label
- 抽出起點 noise 與資料 。這一組配對同時決定中間的 input 與它的 label。
- 抽出 後,用直線插值得到 。網路只會看到 。
- 對這條 reference path 微分,得到 。程式裡比較的就是 model output 與這個已知速度,再把 batch 的平方誤差取平均。
Training loop 只剩幾行:
for step in range(n_steps):
    x0 = torch.randn(batch, 2)       # 起點
    x1 = sample_data(batch)          # 終點
    t  = torch.rand(batch, 1)
    xt = (1 - t) * x0 + t * x1
    loss = ((model(xt, t) - (x1 - x0)) ** 2).mean()
    loss.backward(); opt.step(); opt.zero_grad()
網路看到的是 ,label 則是這一組端點的 reference velocity。它不需要知道 density,也沒有先算 posterior weights;L2 regression 會自己完成平均。
你應該會看到 loss 停在大於零的數字。U2.2 已經說明原因:同一個 可能對應許多不同的 reference velocities,CFM loss 比理想 FM loss 多出的正是 conditional variance。Loss 不到零,不等於模型沒有學到 optimal velocity。
步驟二:沿著學到的 velocity 走
Euler sampler 是
@torch.no_grad()
def euler_sample(model, x0, n_steps):
    x, h = x0, 1.0 / n_steps
    trajectory = [x]
    for i in range(n_steps):
        t = torch.full((x.shape[0], 1), i * h, device=x.device)
        x = x + h * model(x, t)
        trajectory.append(x)
    return torch.stack(trajectory)
先固定一批 ,分別用 10、50、1000 步生成。檢查兩件事:
- 步數增加後,終點 distribution 是否逐漸穩定;
- 圖上的 trajectories 是否等於 training 時畫的直線。
第二題的答案通常是否定的。Training 的直線可以交叉;生成時的 ODE trajectories 跟著 posterior-average velocity,必須繞開那些交叉點。
步驟三:量出 velocity 變化的代價
U3.0 的直覺是:隔很久才重新確認時,方向或速度大小改得越多,越容易走錯。現在固定 exact velocity,把模型誤差拿掉,只比較 solver 與 trajectory。
在 log-log 圖上:
- 斜率主要反映 solver order:Euler 約為 ,Karras 等人 [2] 在 diffusion sampling 採用的 Heun method 約為 ;
- 同一斜率下的高度反映 trajectory 的 error scale;沿途 velocity 變化越大的 path,通常需要更多步。
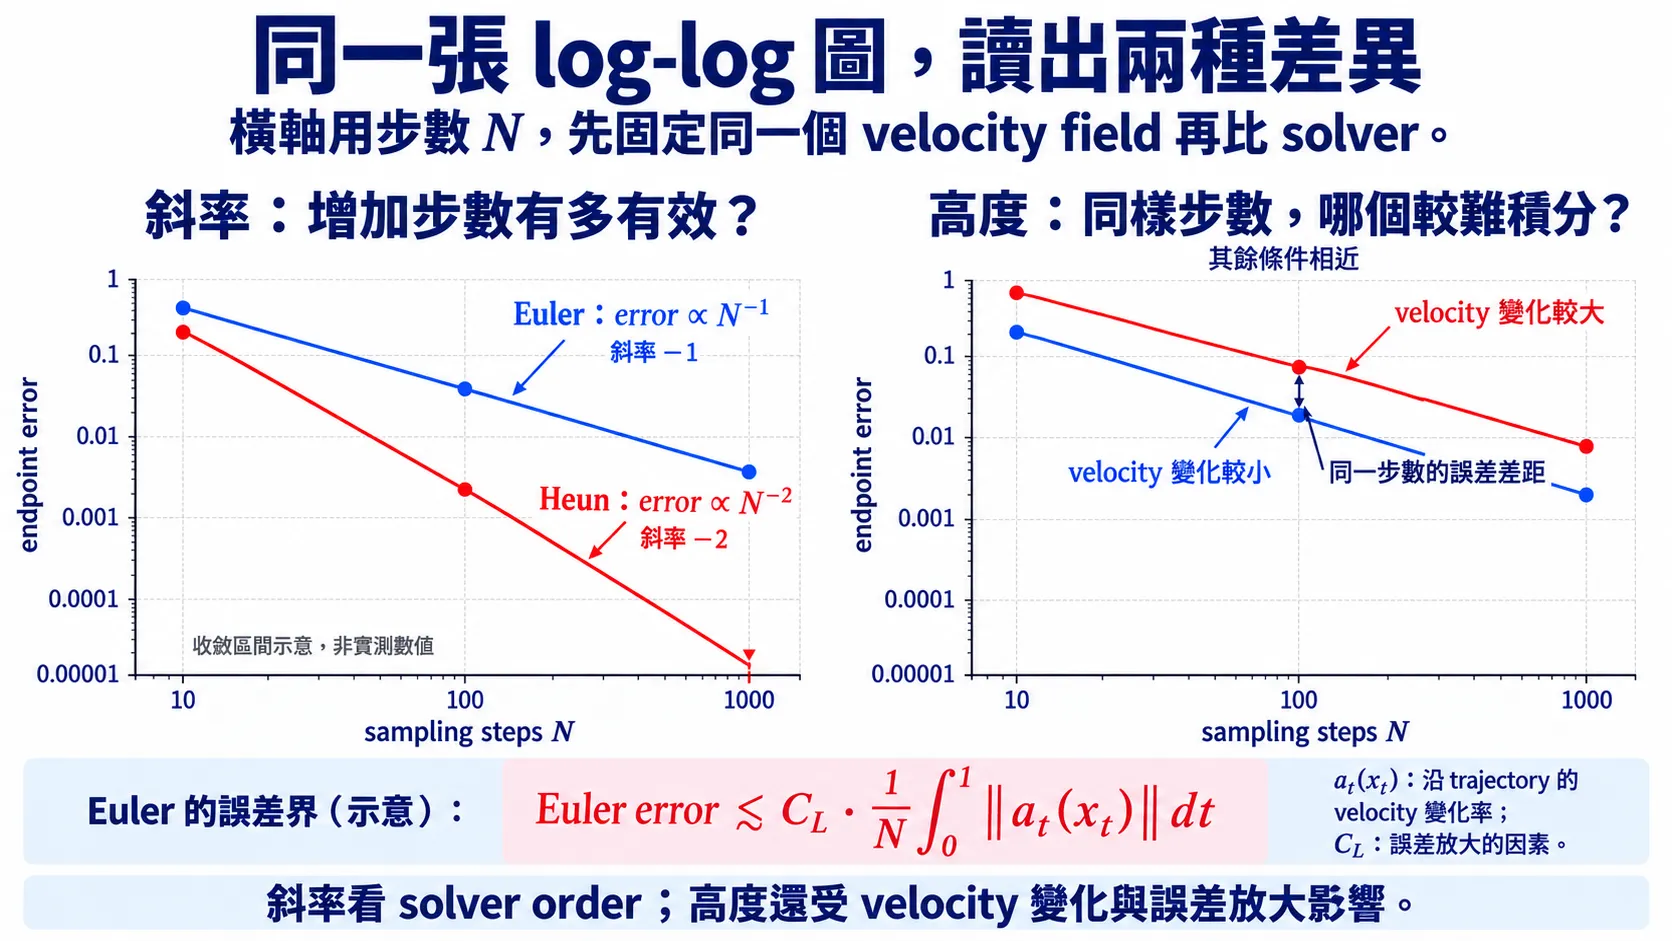
圖:log-log 圖的斜率與高度。 橫軸是步數 ,不是步長 ;在 的收斂區間中,Euler 與 Heun 的斜率分別約為 、。右圖固定 solver,誤差高度除了沿 trajectory 的 velocity 變化,也受誤差放大因素影響;更精確的界會在 U3.1 推出。曲線為示意,非實測結果。
量測提醒先把分岔錯誤與離散化誤差分開
少數粒子可能因為步數不同而走向不同 mode。這種誤差是 ,不會隨步長平滑下降,混進平均後會蓋掉 solver order。
因此 notebook 同時畫 median 與 mean:median 用來讀離散化收斂,mean 則保留「走錯 mode」這個真實但不同的問題。
步驟四:把 U1 的 denoiser 換成 velocity
載入 U1 在 VP path 上訓練的 。依照 U2.3:
def eps_to_velocity(eps_model, x, t):
    a, s = vp_alpha(t), vp_sigma(t)
    da, ds = vp_alpha_dot(t), vp_sigma_dot(t)
    eps = eps_model(x, to_ddpm_time(t))
    return (da / a) * x + (ds - da * s / a) * eps
用 ODE sampler 積分這個 velocity,再與 deterministic DDIM 比較。時間格越細,兩邊的 trajectories 與終點應越接近;剩下的差異來自離散方式與時間格點,而不是另一個模型。
既然 能換成 velocity,
能不能順便把 VP path 換成 linear path?
不能。eps_to_velocity 裡的 必須來自模型 training 時看過的 path。換輸出座標不需要重訓,換中間 distribution 則需要。
作業
- 非 Gaussian 起點。 把 換成 的 uniform distribution,重新訓練並畫出 trajectories。哪些程式碼不必改?
- Coupling。 保持 、 不變,比較 independent pairing 與 minibatch 內依位置配對。畫出 reference paths、ODE trajectories 與少步誤差。
- Path。 固定 pairing,只把 linear path 換成 time-reversed VP path。比較兩者的 marginal trajectories;不要用 conditional paths 的形狀直接猜答案。
- Solver。 對同一個 velocity field 比較 Euler 與 Heun,從 log-log 圖估計斜率。
快速回顧一下
參考文獻
- Lipman, Y., et al. Flow Matching for Generative Modeling. ICLR 2023.
- Karras, T., Aittala, M., Aila, T., Laine, S. Elucidating the Design Space of Diffusion-Based Generative Models. NeurIPS 2022.